If you have students who will not be able to attend some class sessions in person, you may be interested in setting up space to share with them Zoom links, current or previous Zoom recordings, or other content that would only be available to those specific students.
Setting Up a Zoom Meeting for Select Students
This process takes place outside of Canvas in order to regulate which students have access to the Zoom meeting link. Zoom meetings would be useful for allowing select students live remote access to a class session or for remote office hours. (See the Setting Up Office Hours Registration section.
![]()
When running a Zoom session in the classroom, it is recommended you not show the participant list or the gallery of participants on the screen at the front of the class in order for remote students to maintain privacy. You may also recommend that students attending remotely change their Zoom display name to maintain anonymity.
- Go to Cornell.zoom.us and click Login at the top right.
- Enter your NetID and password. (This may not be required if you are already signed into Cornell applications online.)
- Click the red Schedule a New Meeting button near the top left.
- List a clear, descriptive title in the box next to Topic. (You may also want to include a description, but it is not necessary.)
- Choose when to start the meeting and the duration of the meetings on a given day. (If you do not want the meeting set for a specific time, you can skip this step.)
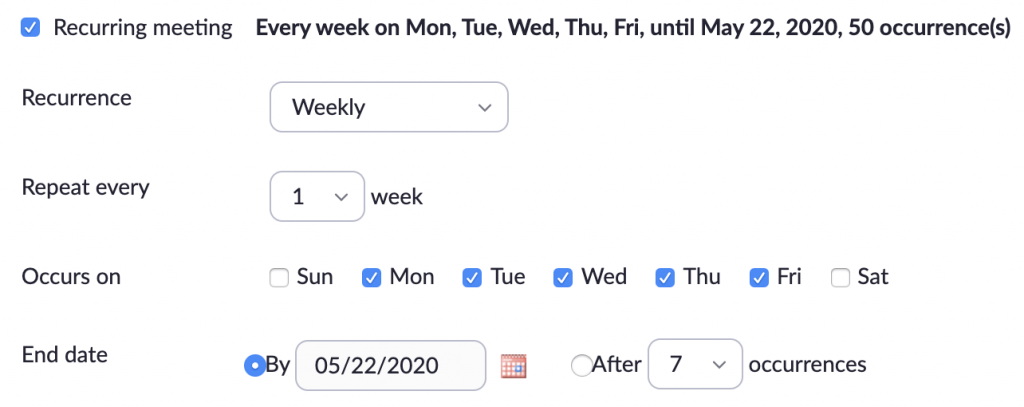
- Check the box next to Recurring Meeting.
- Select the recurrence options desired. If you desire a single link that does not have a specific time associated with it, set Recurrence to No Fixed Time.
- Choose other settings as you desire.
- You may want to check the box next to Enable waiting room for extra security if you have a small number of students who should have access to the meeting link. You may also want to select Require authentication to join in order to know which students use the link.
- It is recommended to turn Participant video off by default and to select Mute participants upon entry. (This will help students maintain privacy.)
- Click the red Save button at the bottom.
- Copy the Invite Link or use Copy Invitation to share with specific students.
Recording a Zoom Meeting for Select Students
To record a Zoom meeting to later be displayed for specific students:
- Click Record in the Zoom toolbar.
- Select Record to the Cloud. Your recording will begin.
- To stop recording, click Pause/Stop Recording or End Meeting.
Once the recording has been stopped, Zoom will process the recording, then transfer it to Cornell’s Video on Demand service. You’ll get a message from Zoom telling you that your recording has been transferred, but it might not be available in Cornell’s Video on Demand service immediately.
Making a Zoom Recording Sharable to Select Students
Zoom recordings, both current and recordings from previous semesters, automatically back up to Cornell’s Video On Demand (VOD) service.
To make a video on the VOD service available to share:
- Visit https://vod.video.cornell.edu and choose the Login option in the Guest dropdown at the top right.
- Click on My Media in the top menu on the left.
- Select your video by clicking its title.
- Open the Actions dropdown menu on the bottom right and choose Publish.
- Change the selection to Unlisted or Published and click the Save button.
- Click Share on the left of the page.
- Copy the URL under Link to Media Page if you want to share a link OR copy the code from the box under Embed if you want to add the video directly into your course.
Sharing Zoom Links and/or Recordings with Select Students
There are a few ways you can share links, recordings, or other content with specific students. One way is to share Zoom links or recording links from the VOD with students via email. We recommend using BCC on group emails to students to maintain their privacy.
Another option (that allows for time-limited access to the links or embedded video) is to set up a Not Graded Assignment through your course in Canvas that is only available to specific students.
- In Course Navigation, click Assignments.
- Click the +Assignment button.
- Name the assignment.
- Use the information area to add content:Paste the Zoom meeting link.
- Embed Zoom recordings right in the assignment (using the Embed option) or paste the video link.
- Add audio recording files using the Upload/Record Media function in the content editor. (DO NOT add video this way, as Canvas is not made to handle video streaming directly.)
- Change the Points to 0 and the Display Grade as box to Not Graded.
- In the Assign To area, choose the specific students who should have access. You can also choose availability dates for the assignment, but this is unnecessary.
- Click the Save & Publish button to save and immediately publish or the Save button to publish at a later time.


